Support
AwrAiter is operated by Mediazione Italia S.r.l. Write to us in any language — we answer in English, Italian or Russian.
Last updated: 2026-09-02
How to reach us
- Telegram (fastest): @awraiter_bot
- Email: privacy.mediazioneitalia@gmail.com
- Certified email (PEC): mediazioneitaliasrl@legalmail.it
We reply within two business days. Billing and account questions are handled by the same channels.
Managing your subscription
Everything below you can do yourself in the panel, without writing to us:
- See the current plan, price and renewal date: Account → Manage subscription (Subscribe on the free plan).
- Change plan, or cancel so the subscription stops at the end of the paid period: Account → Manage subscription → Cancel subscription. Access continues until the period you already paid for ends; after that the account falls back to the free plan with one channel.
- Download a copy of your data, or delete the account permanently: Account → Export my data or Delete my account.
Card payments are processed by Stripe. We never see or store your card number.
Working as a team: inviting people
Several people can run the same channels as one team. The team owner invites them; each member gets a role and, if you want, access to only some of the channels.
Seats. Every member takes one seat, the owner included. The free plan has one seat, so inviting people needs a paid plan; the plan cards in the panel show how many seats each plan gives. A pending invite takes no seat until it is accepted. Settings → Team shows how many seats are used.
The owner invites:
- Open Settings → Team and press Add member.
- Select a role and press Invite.
- Copy the link and send it to the person in any messenger. The link works for 48 hours and for one person; for several people, create a link for each.
The invited person joins:
- Open the link on a device with Telegram. It opens @awraiter_bot; press Start if Telegram asks.
- The bot names the team and your role. Press Accept invitation.
- Press the Open AwrAiter button under the bot's reply. You are signed in and land in the new team.
- Already in another team? Switch teams at the top of the sidebar (Switch team).
Roles and channels. The role decides what a member may do; roles are edited in Settings → Team → Roles. In Settings → Team → Members, the Channels column limits a member to the channels you pick; leave it empty for access to every channel. Remove user frees the seat.
If an invite does not work, the bot says why:
- “This team is on the free plan”: the owner picks a paid plan (Account → Subscribe) and sends a new link.
- “This team's subscription is inactive”: the owner renews it (Account → Manage subscription).
- “This team has reached its member limit”: the owner removes a member or moves to a plan with more seats.
- “This invitation has expired” or “the invitation was not found”: the link is older than 48 hours, was revoked or was already used. The owner creates a new one.
- Nothing happens after the click: open the link in the Telegram app, not in a browser, and press Start.
An AI assistant connected over MCP can walk you through this as well, but it cannot send invites: the team owner creates the link in the panel.
Connecting AwrAiter to ChatGPT, Claude and other assistants (MCP)
AwrAiter has a built-in MCP server: your own AI assistant can read your channel statistics, prepare posts and publish them on your behalf, straight from the chat. It works on every plan, including the free one, and the assistant only ever sees the channels of the team you authorise.
The address you paste into any client is always the same:
- https://awraiter.ai/mcp
Claude (web or desktop, paid plan):
- Open Settings → Connectors.
- Press Add custom connector and paste the address above.
- Press Connect: a AwrAiter page opens, sign in with Telegram and confirm access for the team you want.
- Return to the chat — the AwrAiter tools are now in the tool list. Ask, for example, “show last week’s statistics for my channel”.
ChatGPT — chatgpt.com in the browser, where OAuth is offered:
- Turn on Developer mode: Settings → Security and login → Developer mode.
- Open chatgpt.com/plugins and press + — AwrAiter is not in the plugin catalog yet, so it is added as your own MCP server.
- Paste the address above, leave the authentication as OAuth, and save.
- Press Connect and confirm access on the AwrAiter page that opens.
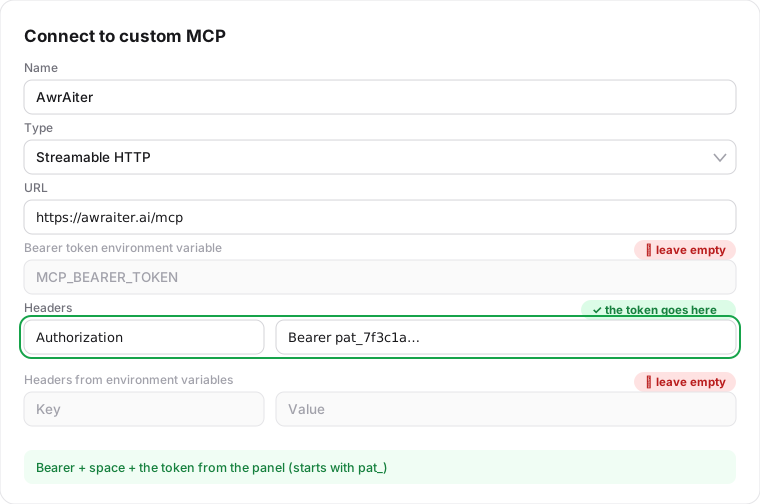
The ChatGPT or Codex app — the “Connect to custom MCP” form, which offers no OAuth choice, only a Bearer token field and headers:
- In the panel open MCP connection (awraiter.ai/mcp-connect) and press Create token: full scope if the assistant may publish, read-only if it should just read analytics. The token is shown once.
- In the client form: Name — anything, Type — Streamable HTTP, URL — the address above.
- Under Headers add the key Authorization with the value Bearer YOUR_TOKEN — the word Bearer, a space, then the token (it starts with pat_).
- Leave the Bearer token environment variable field and the Headers from environment variables block empty: they expect the name of an environment variable on your machine, not the token itself.
- Save. The token is bound to the team that was active when you created it.
Gemini, Qwen and other clients. The consumer apps have no screen for remote MCP servers yet. Use a client that does support them — Gemini CLI, Qwen Code, or any MCP-capable agent — and point it at the same address. If the client cannot do OAuth, mint a personal access token yourself on the MCP connection page of the panel (awraiter.ai/mcp-connect) — choose read-only or full scope — and pass it as an Authorization: Bearer header.
If a client keeps saying it is not authorised, remove the connector and add it again: clients cache the first authorisation response.
Company details
- Mediazione Italia S.r.l.
- Registered office: Largo Guido Donegani 2, 20121 Milano (MI), Italia
- VAT / C.F.: 14278510962